Tuesday, December 27, 2011

"Hare Trigger" step by step 5

"Hare Trigger", 60X40, oil/linen

Hi Everybody, I hope you all had a Merry Christmas (those of you who celebrate it). I finished this painting during the last week before Christmas. Ann and I delivered and hung it on December 23, and now it's permanently in it's new home in Tucson, AZ.

When I posted last, I hadn't even finished laying in the saddle and the cowboy's boot. That was my next step. Once the canvas was covered, I set about refining the painting. The rabbit was an important element and I spent a lot of time making sure he was hauling tail and kicking up lots of back lit dust. I reworked the cowboy's shirt and added a pinstripe and pearl snaps. The shirt needed a bit of interest and the western details were just the thing . I made sure to keep the cowboy's face dark so it was not the first thing you look at. I worked over every inch of the painting, making sure the values, colors, edges and details all were working together. Things like deepening the value and color of the chaps, making sure to work cools in with the warms. That's why there are violets mixed in with the oranges/browns. I changed the headstall that I had roughed in on the horse, and changed the bit to a snaffle bit. I added in details such as the reins that are flying away behind the cowboy. I also added a hint of carving detail in the saddle fenders. The prickly pear cactus were then feeling a bit dark and dead, so I bumped up the color and made sure to mix in warms and cools, and made sure to add lots of back lit spines to add drama and to remind everyone what was at stake here! Then definition in the flying mane, leather fringe on the chaps. The last thing I did was to increase the size of the cowboy's boot by about 15% or so. As I was painting, I had that little voice in the back of my mind telling me it was just reading too small, and when Ann asked if I thought the foot was reading a little small, I knew my little voice was right and that I had to change it.

Then all that was left was to put it in the frame. The frame was a 5" molding and added 10" in either direction. So the final framed dimensions were 70X50". The frame is from America West Frames in Flagstaff, AZ. They always do a great job and work with me to get just what I want.

That's about it! You made it to the end of another painting with me.... thanks for coming along for the ride, and we'll do this again real soon.

Sunday, December 4, 2011

"Hare Trigger" step by step 4

Hare Trigger, step 4, 60X40"

Hi Everybody,
I hope you all had a great Thanksgiving and have sufficiently recovered. I've had to do a bit of art show related traveling and have been away from my easel for too long. But I'm back now and have taken the next step on our painting. This is actually two days of work. I didn't post after the first day because I was working to lay everything in and with the light effect of all the dust and running rabbit, it wouldn't have made any sense to you to show you until I had it all down and relating to each other. This is a pretty good sized canvas and it takes longer than a single day to get your things laid in. Something that slipped my mind when I started this step by step.

So, where are we now. Well, I have the prickly pear, rabbit and dust laid in. But I put it in a little darker than some of it will end up being. A lot of my time was spent in making the prickly pear appear to be partially obscured by the layer of dust the horse is kicking up. In the next step, besides putting the rest of the saddle and cowboy's boot in, I will be going into the foreground to add colors and bouncing light into the cactus and dust layer. I want to lighten it a bit, but not so much that the painting feels top heavy. Remember that it's always better to go from dark to light with oil paints... thin to thick. But for the top dust layer I'll be scumbling on the paint. Scumbling is just a way of saying I'll be adding lighter paint by dry brushing it on over the existing layer of dry paint. If done right, it's a very convincing way of painting dust and making adjustments. Also, I'll continue to add the cactus spines to make it the place the cowboy does not want to end up. As I'm looking at it, I'm feeling that I need to add a few paddles to the cactus that are coming toward the viewer to make it more of a 3D effect. I will be adding a few rocks and twigs in the foreground being kicked up by the bolting hare. Also, it's time to get the light effect around the rabbit perfected. Right now it's a bit dark. I want it to pop a bit more.

Monday, November 14, 2011

"Hare Trigger" step by step 3

Hi Everyone,

I just returned from my Greenhouse Gallery 4 person show. It was a great time and I got to meet Mark Smith and Jim Janes, the gallery owner/operators, as well as the whole staff. We were treated like royalty and for that Ann an I are so grateful. Also, I got to meet, and hang out with two of the three artists who showed with me, Gregory Packard and Andre Kohn. In some ways we couldn't be more different, but in most ways we are fraternity brothers who share so many experiences in life. More on that in another post. We also had the pleasure of meeting many collectors, some of them who have collected my paintings in the past. It's always like meeting friends or even family, when you get to meet people who cared enough about one of your paintings, to take it home. Not to mention the collectors who care enough to put your show on their Friday nite schedule and come out to meet you. Thanks to everyone who took the time to come out, not only for the Friday night reception, but also for my Saturday morning demo. It was my first one at Greenhouse and I hope not the last. There were some awesome people in the audience who asked some very good questions that made me think. When I get the chance, I will be putting up photos in the next week....

.....In the mean time, here is the latest step in the progress of Hare Trigger.

Hare Trigger, 60X40", step 3

The lay-in continues, as well as the comparing of values. To bring the front legs forward on the horse, I keep them darker than the back legs. Those back legs will be covered in dust in the final painting, but it's important to knock them back visually now. Get it as close as you can now, even if you know you will be covering over it later. Since I knew I would be out of town during the lay in stage, I knew I would be working a dry painting at times. When that happens, and I'm ready to start on the dry painting, I will lay it on the ground and give it a good liberal coat of liquin painting medium. This enables me to work on a painting that has the look and feel if wet into wet. It's not the way I prefer to work, as I would much rather work wet into wet straight away, but that's not always possible, particularly when it's a big painting. So with the background sky now blocked in, I lay in the rest of the horse and a good portion of it's saddle. Some of the tack is also added, such as the reins, cinches and stirrup. Along the horse's belly, I've added some greenish reflected light from the cactus below it. It may look a bit odd now, but when I've added in the ground and prickly pear, it will look right. That light is bouncing around, you need to marry together objects by making sure their reflections are there effecting each other.

Tuesday, November 8, 2011

"Hare Trigger" step by step 2

So, as you can see, I've jumped right in on the cowboy's face, then shirt, hat and finally I've roughed in some of the sky, just to make sure my relationships are right. I'll keep beating the "Don't get caught up in the details" drum. This painting will change considerably as I work on it.

Working down the canvas, I continue to lay in the chaps, jeans and glove. Then it's on to the body of the horse. I will work along areas that touch each other, rather than jumping from the cowboy's face to the rabbit or prickly pear. It's easier to judge values when you have objects next to one another than trying to guess how they'll line up once they do come together. I try to make it as easy on myself as possible. Also, I'm working on the clouds and sky in the background. It's easier to work the edges of the cowboy and horse into the background when everything is wet, rather than coming back to them later when they are dry. I tend to keep my edges soft at this point, knowing that #1) it looks more natural that way, and #2) it's going to be a painting that has a lot of dust in it and that demands softer edges.

Monday, November 7, 2011

New Step by Step of painting "Hare Trigger"


Hi Everybody,

Yeah, I know, it's been forever since I've posted. I'm sorry about that. I've spent the Summer doing paintings for the Greenhouse 4 person show, "Through the Artist's Eyes". It opens on November 8, 2011, and runs through the month of November. I'm done with the paintings now and they are at the gallery. So....now I've started working on my largest painting so far, a 60X40" I'm calling "Hare Trigger. It's one I've been preparing to do for a while and I was excited to finally put paint to canvas. I've been collecting my reference, taking photo reference and doing sketches, refining the design and composition. In this blog, I will be taking you step by step, day by day to the painting's finish. The only break I'll be taking is for the show opening coming up. But I hope you'll hardly notice. As I work it, I'll post it. I hope this will be a help to you artists just starting out, and help to take some of the mystery away for you collectors. There's nothing mystical about what we artists do. It's very logical.

To start, let me share with you my sketch, and the reference I've taken and used to assemble this painting.


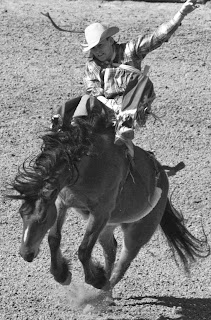
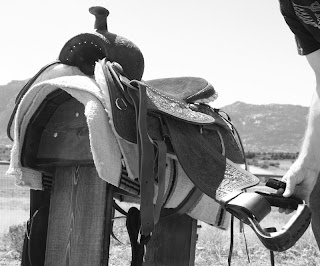
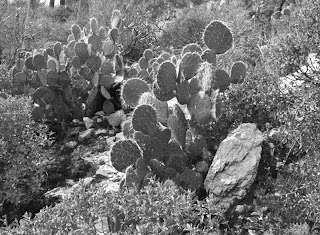
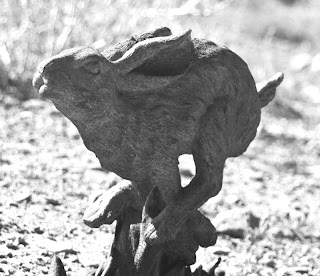
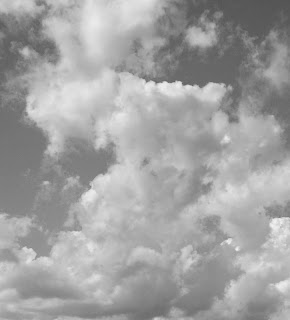
These sketches are for information/design use only.... The whole idea is to get the compositional elements in place and work out all the problems such as focal point. I don't spend a lot of time on these and don't think of them as precious in any way, they're just a tool. Right now things are fluid and I don't want to be locked in along the way, and doing finished drawings are a good way to fall into that trap. I want just enough information to get things onto the canvas in the area they need to be. Here are the reference photos I took in preparation to assemble the concept. Again, nothing fancy, but it's imperative that the light source is consistent. For this painting I needed the horse/rider, the bronc rider is from a rodeo and doesn't have the right kind of saddle, so I had to add that to the horse. I used one of my saddles and took lots of photos of it in different positions (things like the stirrups and the fender). From that photo shoot I selected the one that was right for the horse and rider photo I had. Next, I needed prickly pear cactus reference, which is easy enough around here. The next is the running rabbit. Since I knew I was going to be painting this, I kept my eyes open for good reference. I was open to inventing the rabbit, but knew that it would be more successful if I had reference. Luckily, I was in a local shop and discovered a statue of a rabbit running, in just the pose I wanted. I don't get lucky often, but once in a while.... so, I photographed the statue in the postion I needed it to be in. The final reference is a cloud shot I had in my reference morgue. I'm showing everything in black and white because the colors don't matter now, just the values (lights and darks). It's all about simplicity and structure in this stage. Colors can be deceptive, but values don't lie.
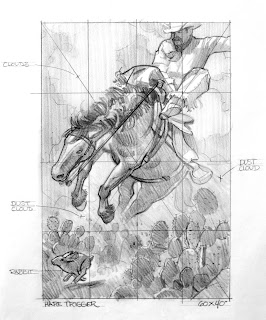
________________________________

________________________________

________________________________

________________________________

________________________________
finished sketch


So now, once this prep work is done, it's time to transfer the drawing onto the canvas. I grid the drawing, scale it up, and draw it onto the canvas. Now it's time to start painting.... finally! But remember, it doesn't do any good to short yourself on this prep work. It's as important, if not more so, than the painting part. The more problems you solve on the front end of the project, the easier it will go when you get to painting. Then you can concentrate on applying the paint, not on having to move things around. This is a large painting and I'll have my hands full of other problems as I go along, but not composition problems.

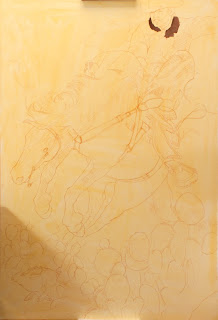
Here it is on the canvas. No heavy duty details, just an simple drawing with everything in place. The shadow you see on the lower left side of the canvas is from my painting table (I'm a lefty), and the shadow on the top of the canvas is from the canvas holder attached to my easel. I work on a Hughes Easel, which makes working on a larger canvas a breeze. I can move around the canvas with the touch of a finger. Up and down, or side to side, it doesn't matter, it's easy to work the entire canvas on this easel. As you can see, I started applying the paint around the face area. If I'm going to have a problem with an area, this is probably going to be it, so I'd rather know it early on when I'm still fresh and eager.

Well, that's enough for the first day back to blogging. Thanks for taking the time to follow me and I hope this will take some of the mystery out of the artist's studio. If you have questions as I go along, don't be shy. I'll try to cover everything I can think of, but you know how it is.

Happy Painting, Steve

Thursday, February 24, 2011

NEW PAINTINGS FOR UPCOMING EVENTS...

"Bradley" © 2011, 16X12, oil on stretched linen
Phippen Museum's 37th Annual Western Art Show and Sale
May 28, 29 & 30, 2001 Prescott, Az


Like most working artists, I've been putting in lots and lots of time in the studio. I'm working on getting together as many new paintings as I can for my first year's participation in the Phippen Museum's Western Art Show and Sale on May 28, 29 + 30, 2011. I've attended the show many times as a visitor, but this is my first ever participating in an outdoor show. I'm learning lots about tents, display walls and what services are available for commerce challenged artists like myself, so I'll be able to take credit cards as payment.... I'll also be participating in a quick draw for the first time. It takes me back to my college days when I worked at an amusement park for a summer, while on display airbrushing tshirts.

•••••••••

"Welcome to the Family" © 2011, 24X30, oil on stretched linen
Trailside Galleries (480) 945-7751


In the mean time I just finished this painting for Trailside Gallery's Western Art Classic Show, March 7-19, 2011, in Scottsdale, Az. It's always a good show with very good turnout. I'll be at the artist's reception on March 17, 7-9 pm.


•••••••••

"Guardian of Honor" © 2011, 24X36, oil on stretched linen
Greenhouse Gallery of Fine Art (800) 453-8991


I'm also pleased to announce that I've added two new galleries to represent me. Windrush Gallery in Sedona, Az and Greenhouse Gallery of Fine Art in San Antonio, Tx. I'll be adding new artwork to both of these galleries in the coming months, so check back often.


and as always, Thanks for lookin' ---Steve

Monday, February 7, 2011

Cowboy Reading Light

Hi Everybody,
this is my latest painting, which I call "Cowboy Reading Light". The inspiration for it came from the great cowboy song titled "Night Rider's Lament" by Michael Burton. I've heard that Garth Brooks recorded the song, though I haven't heard his version, but then many cowboy musicians have recorded it. I've also heard that this is the only cowboy song Michael has ever written. I'm always moved by the message in the song. It paints such a vivid picture...... Here are the lyrics:


Night Rider's Lament
Lyrics and Music by Michael Burton


Last night as I was out a ridin’

graveyard shift, midnight ‘till dawn
the moon was as bright as a readin’ light
for a letter from an old friend back home

Chorus: He asked me why do you ride for your money
Why do you rope for short pay
You ain’t getting’ nowhere
And you’re losin’ your share
Boy, you must have gone crazy out there
But he’s never seen the Northern Lights
Never seen a hawk on the wing

He’s never seen Spring hit the Great Divide

And never heard Ol’ Camp Cookie sing


He tells me last night I run onto Jenny
she’s married and has a good life

Ah, you sure missed the track
when you never come back

she’s a perfect professional’s wife


Chorus:
She asked him why does he ride for his money
Why does he rope for short pay

He ain’t getting’ nowhere and he’s losin’ his share

He must have gone crazy out there

But she’s never seen the Northern Lights

Never seen a hawk on the wing

Never seen Spring hit the Great Divide
And never heard Ol’ Camp Cookie sing

Well I read up the last of that letter
and tore off the stamp for Black Jim
When Billy rode up to relieve me
he just looked at the letter and grinned

Chorus:
He sang . . .Now. . . Why do they ride for their money
Why do they rope for short pay

They ain’t getting nowhere
And they’re losing their share

Son, they all must be crazy out there


I do know that this song paints such a vivid picture in my mind, that I had to put it down on canvas. My goal was to give it a dream like quality. I hope I've come close to doing it justice. I also know that nobody would have understood the meaning of the title if I had given the painting the same name as the song.... besides, the name is a bit of a downer. So, "Cowboy Reading Light" seemed like a perfect fit for it!

Thanks for looking, Steve

Tuesday, January 18, 2011

Skull Valley and Beyond

Skull Valley, 9X12, oil/cavas panel ©2011


Hi Everybody!
Last week I got out of the studio long enough to paint this piece on location. I found this view when I was out geocaching, which is a modern day treasure hunt (hidden are little capsule which contain a log book to sign in and some small trinkets you are free to take with you, as long as you leave something of equal value. But for me the treasures are the locations I'm taken to by other geocachers who hide caches for the rest of us to find. Locations I might never find on my own. Breathtaking views and vistas are the norm). Anyways, when I found this site, I knew I would have to come back to paint it. We've had plenty of snow here in the high desert and this scene is evidence of that. True enough it usually doesn't stay around long, but if you're quick you can get it down before it melts. As the name implies, this is a view of Skull Valley which is a ranching area.


Skull Valley photo reference

I got this down between 3 and 5pm, and touched it up a bit in the studio. When I started out it was intermittently cloudy, but was clearing up. Here is what the scene looked like when I started painting it. As the afternoon wore on it cleared up and I was able to get the light effect I was looking for.

Thanks for looking! Steve

Friday, January 7, 2011

Painted the Grand Canyon yesterday


Grand Twilight, 10X8, oil/linen panel


Hi Everybody,
yesterday I was fortunate enough to take a road trip with fellow painter extraordinaire Bill Cramer. Bill is an extremely talented painter who spends a lot of time outdoors painting on location. So when I had the chance to get back up to the Grand Canyon with him, I jumped at it. Though you would have thought having my plein air butt kicked there last September would have been enough! But I figured, Hey, It's a new year, there's snow on the ground, and well.... it's the Grand Freakin' Canyon. Many thanks to Bill for all the coaching and tips he shared with me about painting the Canyon. Plein air painters joke that painting the Grand Canyon is like getting your graduate degree in location painting. I couldn't agree more. We only had time for a couple of studies. Today in the studio after a good night's sleep, I decided one of them was good only for a color study from which I can do a larger painting down the road. Which is the real reason to do these in the first place. But the second one had possibilities if I did some repainting. So, even though this painting started as a plein air, it is squarely a studio piece.

The painting ended up being set at twilight with the stars just becoming visible. The colors are saturated and the shadows in the canyon are long and deep. It retains the feeling of a plein air because I kept my brush loose. I don't believe it would have improved the painting by tightening it up. What's important to me here is the feeling and mood of the light.

Thanks for looking, Steve

Tuesday, January 4, 2011

Canyon Glow

Canyon Glow, 9X12, oil on canvas panel

Hi Everyone,
Things have been busy in the studio. I've been working on several figurative paintings lately, which for me at least, take more time to finish. But I found time to do this landscape studio painting last week, just before Christmas. Ann and I have a tradition of going to Zion in early November right after the peak season finishes. The cottonwood trees are at their peak and the weather is cool and comfy (ok, sometimes it's cold and frigid). At this time of year, the sun's arch is low in the sky and it takes a long time for it to light up the canyons, but boy when it does, it's glorious! I always joke that at this time of year, you can't throw a stone without killing a photographer.... they're EVERYWHERE! And since we're all there for the same reason, it's like you're part of this fraternity that's on a working holiday. Most of our time is taken up with being with friends, so I didn't bring my paintbox this time, but my camera was never out of my hand. I remember taking the photo from which I painted this picture. I stood there for some time making mental notes about what the light was doing, the color temps and why it would be so effective as a painting. The smaller trees which are still in shadow in the foreground were surprisingly green compared to the line of cottonwoods being lit by the sun. This helps to separate them from the focal point of the glowing foliage. There was quite a bit more detail in the canyon wall, but if I had painted it in in the same detail as was there, it would have competed with the tree line, so I minimized it. I have a quotation taped to the top of my easel which I see every day to remind myself, "Minimize the Obvious, Maximize the Essential". That about says it all!

Thanks for looking, Steve