I'm now settled into my new studio and have begun painting again. For this entry, I thought I would post another painting demo. It's been quite a while since I did a demo, and I feel like it's time. This time around the painting is called "First String" I'll take you from the initial concept pencil and include as much of my thought process as I can include without putting you to sleep.
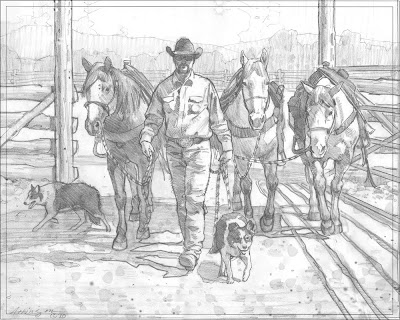
Here is the pencil I did to work out any kinks, and save me time on the easel. If I don't work out all the holes I have in my reference, I can spend a lot of time repainting areas, so, for me, it's time well spent up front. The main image of the horses and cowboy is from some reference I took at the Tucson Rodeo in February. The lighting was less than I deal and I had an idea to add some backlit dust to knock back the background and help with the focal point. The dogs were added to help with the concept and to highlight the partnership between cowboys, horses, and dogs. Besides, I like painting dogs. Hey, it's a weakness. The middle ground with the gate, fence and treelined background were invented using separate reference photos. Just enough of a background to give it a general place. It's not that important to the painting, so I don't overdo it with detail. When I put them all together, I find out if the drawing has enough merit to carry it into a painting. I originally was going to do this painting 18X24", but I decided that it would look better and have more impact at a larger size. So, the finished painting will be done at 24X30".
__________________
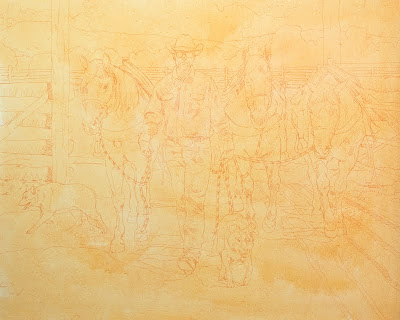 Once I'm happy with the pencil, I transfer the image to the toned canvas. I tone all my canvases using a color I think will work if I let little areas unpainted and poking through. For this painting, since it will be infused with dust, I used a thin wash of yellow ochre. When I do plein air work I usually use a thin wash of Cadmium Orange. It just depends on the painting.
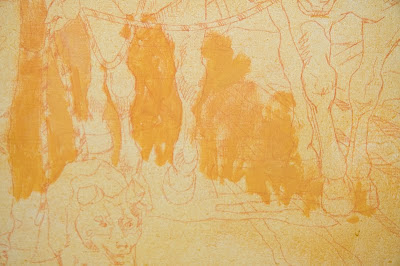 This is a close-up of the very beginning of the painting process. I included this photo to show you how thin the paint is at this point. If you look at the paint that's being loosely applied, you can still faintly see the drawing through the wash. The paint isn't like watercolor wash, it's thicker than that, but still thin enough to work over. This is important to me since I will be working over it while it's still wet.
 My painting set up is pretty simple. The painting is on my easel. I've mounted my 30" display monitor on a wall swing arm mount. This allows me to work horizontally, or rotate my monitor 90º and view it vertically, which makes for a much larger viewing area if the piece I'm working on is in portrait mode. On my monitor you can see my original photo, to which I've added the dogs in Photoshop. Also, I've got a photo of western fencing I'm using as generic reference. The lighting isn't right, but it lets me see the details of how it's constructed. And, I keep my sketch taped to the wall, to refer to when I need to see how I worked things out, just in case.
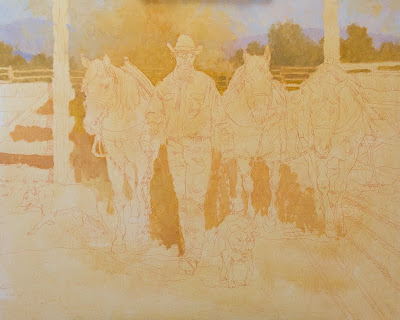 I'm only at the start of the lay in, but I wanted to show how simply it begins. Right now all I'm concerned with is getting the value relationships close. This block in goes pretty quickly, since I am not putting in any detail. In fact, I don't always put in the lightest lights or darkest darks. I don't know what needs to be detailed now, and if I put them in, I run the risk of making it too busy. The simpler the start the better. I can always add more later, but it's harder to take it out.
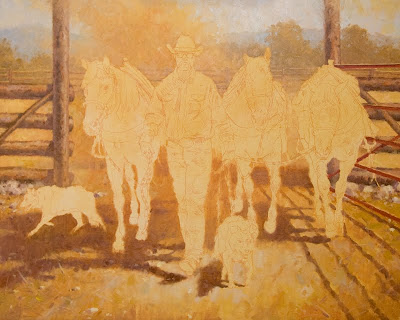 Here is where I ended up at the end of the first day. Simple shapes, simple values and most of my time was spent thinking about supporting the figures once they started to go in. The dust cloud behind my figures is going in well and I think will highlight the focal point and add the dramatic lighting I want. I'm not just painting the reference photo exactly like it is, I'm adding a light effect to make it a painting and have it create a mood. This painting will be all about attitude and confidence. Almost like gladiators walking into the coliseum, ready to do battle.
Round 2 will come tomorrow....


7 comments:
This is all looking fantastic so far. I'll definitely check back later to see how it all comes together. The step by step is very enlightening too, and I hope that one day I have the confidence to work with paint as confidently, and as proficiently as you do!
I have one question (and its probably quite silly) but how did you enlarge the drawing and transfer it to the canvas?
I really enjoyed looking through your work Steve, do keep it up. All the best!
Nice Steve. I have been starting my paintings this way and I am learning to like the organization that comes with it. Thanks a ton for posting this. I know it takes time and we appreciate it. I will post a link on my blog so others can see it too. By the way, I saw your art in Scottsdale this week at Trailside. Nice!
This looks amazing ...awaiting the final round
Welcome Back Steve after your brief hiatus.It must be a relief getting back on the horse so to speak,and get back to your easel.
Like what you have come up with for your first post. Seeing the progression from drawing to finished painting is a great help to us somewhat newcomers.
Thanks Tim Fitz
Very cool demo. This is the stuff I love to see. Welcome back to the blog world.
Thanks Guys for all the positive feedback, especially so early on in the process. It could all go horribly wrong and fall apart, but I'm willing to take that chance.
Finn, it's not a silly question at all! BTW, I like your illustrations and your style. Quite impressive (especially the faust poster). Anyways, I have a few different ways of getting an image down onto a canvas. Drawing it directly onto the canvas using a #6 brush and turp thinned oil paint, or vine charcoal or prisma pencil is my usual way of doing it. A demo I posted called "Walk Softly" shows that technique. Another way I do it, usually if I'm enlarging a plein air study to a do a larger painting, is to tape a sheet of clear acetate over the dry study and grid it off. Grid the larger proportional painting the same and draw it in following the grid.
The technique I used on this painting, I learned while reading an article about Howard Terpning a few years ago. He does a smaller drawing of the composition of a painting with everything worked out and in it's place. When he's happy with it, he has an actual sized print made (I go to Kinkos) on their thinnest bond paper, rubs the back with charcoal dust and traces it down. It's one of those things illustrators do to speed things up and get to the painting. As long as I'm doing it from a drawing I've done myself, I'm fine with it.
I appreciate all your posts, truly! It makes me feel like I'm not talking to myself. Ha!
This is so helpful and informative, and I know that it's time consuming for you..so a big thank you for all the detailed information. Looking forward to the next installment!
Post a Comment